

Easy Stage - using music sheets on stage
I'm using my IPAD to show leadsheets as PDF- or PNG-files.
On stage I do not want to worry about instruction sheets of the app I am using, but I only want to make good music.
On the other hand the sets you play may differ from gig to gig. It should be easy to arrange sets without being forced to store the files several times.
To meet these requirements the app is divided in two parts:
Part 1: On stage
On stage you wipe left with your finger to get the next file or you wipe up and down to leaf through the sheets of one file. You can use a bluetooth footpedal too.
If you have no sets, you can go back to the list of files by tapping on a little button in the upper left-hand corner. Select the next file from the "All"-list.
On stage it may happen that you count in too fast because you are too excited.
To avoid this you can add the velocity of each song in beats per minute to the song in question. A little metronome, which blinks in the upper right-hand corner of the music sheet, will help you.
Starting with version 3.0 you can search for a title. If you tap on the magnifying glass in the middle at the bottom, a window opens. There you enter at least a part of the searched title and end this with Return. You will then see all titles that match your input. If you select a title, it will be displayed and you will return to the subfolder where this title is located.
One special feature of PDF files should also be mentioned. If they do not fit on the screen completely, then a whole screen page is always scrolled further when swiping upwards or downwards. With a double-tap on the screen, you can establish the normal scroll mode. Please note that this also turns off spontaneous screen scrolling in the professional version. To turn this back on, you must go back to the selection window and reopen the page.
Part 2: At home
When you organize your sheets and sets for the next gig, the files (PDF, PNG, DOC, ...) are created by your favourite music program, a word processor or a scanner. You have to store these files in a new folder on Dropbox. PDF- or PNG-format should always be possible.
This app uses a Dropbox account. You do not need any internet connection on stage. Everything works offline.
The advantage of Dropbox is that you do not have any trouble to transfer your data from Mac or PC to Easy Stage.
Starting with version 3.0, it is now possible to use Easy Stage even with an old iPad 2 that does not have the required iOS version for Dropbox. To do this, connect the iPad to the Mac or PC and copy the files directly to the EasyStage directory on the iPad using the Finder or iTunes. This also works with newer iPads if you select "Local files" in the sync folder selection. But you have to copy the files before, then a database will be created automatically.
If you tap on "Done", the app begins to synchronize the selected folders. The process is shown by a spinning wheel on the tab bar at the bottom. On this tab bar you can select whether the synchronization should only use wifi or mobile data too.
You
can find all downloaded files in the "All"-folder in the column on the
left. In the column on the right and later on in the folder "Sets" in
the column on the left you can find
your sets. If you want to create a new set list for your next gig
at Carnegie Hall, tap first on + at the bottom and add "Carnegie
Hall". If you want to play three sets, tap on
"Carnegie Hall" and add Set1, Set2 and Set3 by tapping on + . Now tap
on Set1.
whether the synchronization should only use wifi or mobile data too.
You
can find all downloaded files in the "All"-folder in the column on the
left. In the column on the right and later on in the folder "Sets" in
the column on the left you can find
your sets. If you want to create a new set list for your next gig
at Carnegie Hall, tap first on + at the bottom and add "Carnegie
Hall". If you want to play three sets, tap on
"Carnegie Hall" and add Set1, Set2 and Set3 by tapping on + . Now tap
on Set1.
Select the first song in the "All"-folder and keep pressing on the song. Then drag the song to the right column. Repeat this with any other song.
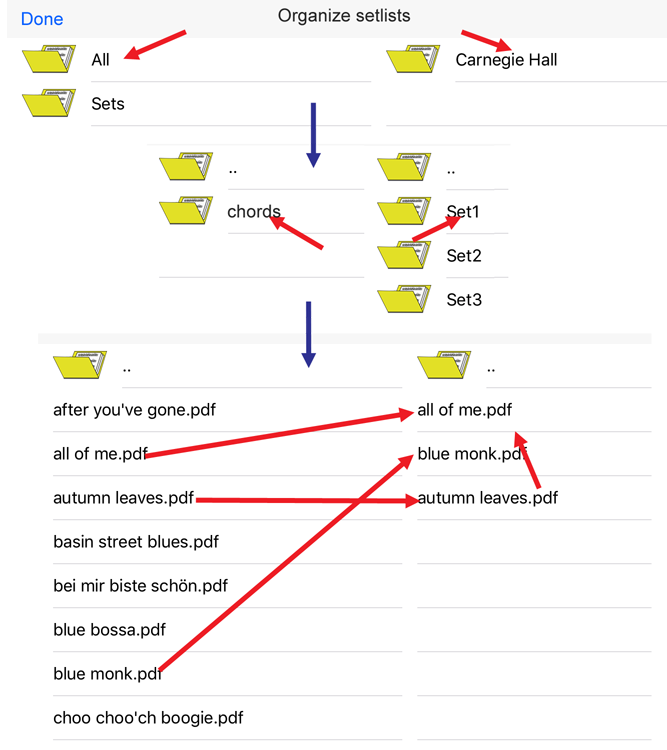
The songs can be renamed and deleted by tapping on the song and then on . If you want to delete a song, now tap on minus, if you want to rename
a song, tap on its name. You can change the order of the songs by
dragging them up and
down. This is how you can create sets for each gig. These sets will be
shown
in the left column too and can be the basis of new sets.
. If you want to delete a song, now tap on minus, if you want to rename
a song, tap on its name. You can change the order of the songs by
dragging them up and
down. This is how you can create sets for each gig. These sets will be
shown
in the left column too and can be the basis of new sets.
In the text field at the bottom you can add the velocity in beats per minute. In the "All"-folder this is a basic definition that will automatically be applied to the song being dragged into any set. If you do so in a set, the velocity is only applied to the song in the concering set. On stage there is a metronome blinking, which is only visible if you have defined the velocity of the concerning song.
In case you need to digitalize a fixed arrangement or some scores on paper, take a photo and place it in a subfolder of the "All"-folder. As soon as you are online the photo will be uploaded to Dropbox.
If you tap on "Done", the changes will be saved and you see the start page that will be used on stage. Test it! Is everything working?
In the window, where you organize your set lists, you can select a file in the left table. The file will be shown, as known from stage mode, including a little additional tool window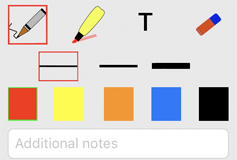 .
.
If there is nothing selected in the first row, you can navigate in and scroll your sheets.
There is a pencil to write and a marker to highlight text which can be used with your finger or Apple pencil. The width of your pencil or marker can be selected in the second row. If you select T, a textfield will be shown in the second row. You need to tap with your finger or Apple pencil on the position where you want to place your text. Write your text by using the virtual keyboard and press the return button. You can move your text with your finger or Apple pencil. By means of the buttons on the left and the right, you can change the font size. The colour can be chosen in the third row.
Delete single notes by using the rubber.
You can use the textfield of the last row to add some text to the piece of music you are working on. This text could for example be the key of the song. As described later on, it will be shown in the spreadsheet of your set.
Basically: Your notes will be copied by drag and drop from the left to the right table. They can be changed afterwards for this special set. That is how to take different notes for the same sheet in different sets.
Select a set list from the right table and select. Tap now on  and share this set list with other musicians as spreadsheet.
In addition, the set list is then exported in an EasyStage format and shared. A fellow musician or you yourself can then take over this on another device with the button .
.
If the list was sent by mail, it is sufficient to tap on the mail attachment to import the list. Airdrop is even more convenient, but requires a newer iOS version. An important prerequisite here is that the fellow musician has saved the corresponding sheet of music with the same file name on his device. Since this function also works with the basic setlist, the synchronization of setlists via Dropbox that was available in the previous version is no longer necessary. This can now also be accessed via iCloud or Airdrop between your own devices, for example.
The search function available in stage mode is also available in the organization window in the professional extension.
For musicians who do not use a foot pedal for scrolling, an autoscroll function has been added. To do this, you enter the approximate time needed to play the piece in the autoscroll field. The sheet of music then scrolls slowly downwards in this time smoke. A start button then appears in stage mode, which you trigger at the beginning of the piece. You can also spontaneously change the duration of the piece. In general, you can also spontaneously select autoscrolling. To do this, hold your finger on the screen for a second in stage mode, then the above-mentioned window with the start button appears. Now you should set the approximate time and then you can start.
If you touch the screen during the play, the autoscrolling will be aborted.
Scrolling makes sense only with multi-page PDF files. Please note that scrolling is set up in such a way that it does not start immediately, but always tries to keep the currently played notes approximately in the center of the screen.
On stage I do not want to worry about instruction sheets of the app I am using, but I only want to make good music.
On the other hand the sets you play may differ from gig to gig. It should be easy to arrange sets without being forced to store the files several times.
To meet these requirements the app is divided in two parts:
Part 1: On stage
On stage you wipe left with your finger to get the next file or you wipe up and down to leaf through the sheets of one file. You can use a bluetooth footpedal too.
If you have no sets, you can go back to the list of files by tapping on a little button in the upper left-hand corner. Select the next file from the "All"-list.
On stage it may happen that you count in too fast because you are too excited.
To avoid this you can add the velocity of each song in beats per minute to the song in question. A little metronome, which blinks in the upper right-hand corner of the music sheet, will help you.
Starting with version 3.0 you can search for a title. If you tap on the magnifying glass in the middle at the bottom, a window opens. There you enter at least a part of the searched title and end this with Return. You will then see all titles that match your input. If you select a title, it will be displayed and you will return to the subfolder where this title is located.
One special feature of PDF files should also be mentioned. If they do not fit on the screen completely, then a whole screen page is always scrolled further when swiping upwards or downwards. With a double-tap on the screen, you can establish the normal scroll mode. Please note that this also turns off spontaneous screen scrolling in the professional version. To turn this back on, you must go back to the selection window and reopen the page.
Part 2: At home
When you organize your sheets and sets for the next gig, the files (PDF, PNG, DOC, ...) are created by your favourite music program, a word processor or a scanner. You have to store these files in a new folder on Dropbox. PDF- or PNG-format should always be possible.
This app uses a Dropbox account. You do not need any internet connection on stage. Everything works offline.
The advantage of Dropbox is that you do not have any trouble to transfer your data from Mac or PC to Easy Stage.
Starting with version 3.0, it is now possible to use Easy Stage even with an old iPad 2 that does not have the required iOS version for Dropbox. To do this, connect the iPad to the Mac or PC and copy the files directly to the EasyStage directory on the iPad using the Finder or iTunes. This also works with newer iPads if you select "Local files" in the sync folder selection. But you have to copy the files before, then a database will be created automatically.
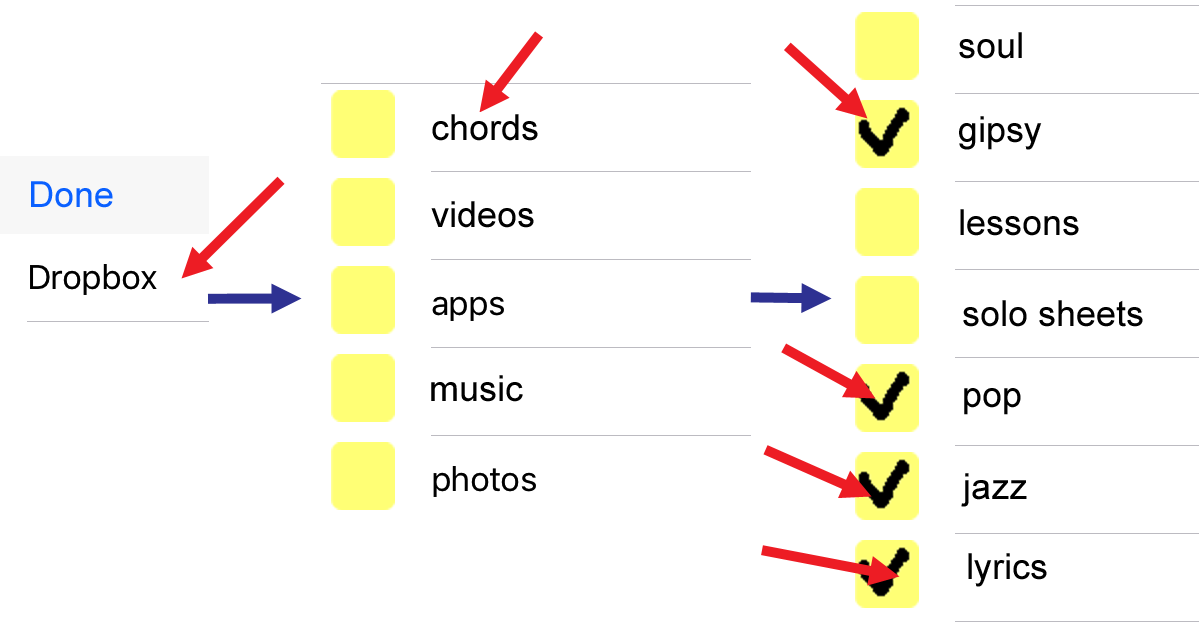
Tap on and on the next screen tap on  in the upper right-hand corner. Then you will see a page where you can
select the folders on dropbox which are to be synchronized. At the first
start of Easy Stage this page will be shown automatically. in the upper right-hand corner. Then you will see a page where you can
select the folders on dropbox which are to be synchronized. At the first
start of Easy Stage this page will be shown automatically.You can leaf through the Dropbox directories and select a folder by tapping on the yellow box. All subfolders will be selected automatically. |
 |
If you tap on "Done", the app begins to synchronize the selected folders. The process is shown by a spinning wheel on the tab bar at the bottom. On this tab bar you can select
whether the synchronization should only use wifi or mobile data too.
You
can find all downloaded files in the "All"-folder in the column on the
left. In the column on the right and later on in the folder "Sets" in
the column on the left you can find
your sets. If you want to create a new set list for your next gig
at Carnegie Hall, tap first on + at the bottom and add "Carnegie
Hall". If you want to play three sets, tap on
"Carnegie Hall" and add Set1, Set2 and Set3 by tapping on + . Now tap
on Set1.Select the first song in the "All"-folder and keep pressing on the song. Then drag the song to the right column. Repeat this with any other song.
The songs can be renamed and deleted by tapping on the song and then on
. If you want to delete a song, now tap on minus, if you want to rename
a song, tap on its name. You can change the order of the songs by
dragging them up and
down. This is how you can create sets for each gig. These sets will be
shown
in the left column too and can be the basis of new sets.In the text field at the bottom you can add the velocity in beats per minute. In the "All"-folder this is a basic definition that will automatically be applied to the song being dragged into any set. If you do so in a set, the velocity is only applied to the song in the concering set. On stage there is a metronome blinking, which is only visible if you have defined the velocity of the concerning song.
In case you need to digitalize a fixed arrangement or some scores on paper, take a
photo and place it in a subfolder of the "All"-folder. As soon as you are online the photo will be uploaded to Dropbox.If you tap on "Done", the changes will be saved and you see the start page that will be used on stage. Test it! Is everything working?
In-app purchases
Select Information about in-app purchases. A window will open, where additional features can be purchased. Use these features in the following way:In the window, where you organize your set lists, you can select a file in the left table. The file will be shown, as known from stage mode, including a little additional tool window
.If there is nothing selected in the first row, you can navigate in and scroll your sheets.
There is a pencil to write and a marker to highlight text which can be used with your finger or Apple pencil. The width of your pencil or marker can be selected in the second row. If you select T, a textfield will be shown in the second row. You need to tap with your finger or Apple pencil on the position where you want to place your text. Write your text by using the virtual keyboard and press the return button. You can move your text with your finger or Apple pencil. By means of the buttons on the left and the right, you can change the font size. The colour can be chosen in the third row.
Delete single notes by using the rubber.
You can use the textfield of the last row to add some text to the piece of music you are working on. This text could for example be the key of the song. As described later on, it will be shown in the spreadsheet of your set.
Basically: Your notes will be copied by drag and drop from the left to the right table. They can be changed afterwards for this special set. That is how to take different notes for the same sheet in different sets.
Select a set list from the right table and select
. Tap now on and share this set list with other musicians as spreadsheet. In addition, the set list is then exported in an EasyStage format and shared. A fellow musician or you yourself can then take over this on another device with the button
.If the list was sent by mail, it is sufficient to tap on the mail attachment to import the list. Airdrop is even more convenient, but requires a newer iOS version. An important prerequisite here is that the fellow musician has saved the corresponding sheet of music with the same file name on his device. Since this function also works with the basic setlist, the synchronization of setlists via Dropbox that was available in the previous version is no longer necessary. This can now also be accessed via iCloud or Airdrop between your own devices, for example.
The search function
available in stage mode is also available in the organization window in the professional extension.For musicians who do not use a foot pedal for scrolling, an autoscroll function has been added. To do this, you enter the approximate time needed to play the piece in the autoscroll field. The sheet of music then scrolls slowly downwards in this time smoke. A start button then appears in stage mode, which you trigger at the beginning of the piece. You can also spontaneously change the duration of the piece. In general, you can also spontaneously select autoscrolling. To do this, hold your finger on the screen for a second in stage mode, then the above-mentioned window with the start button appears. Now you should set the approximate time and then you can start.
If you touch the screen during the play, the autoscrolling will be aborted.
Scrolling makes sense only with multi-page PDF files. Please note that scrolling is set up in such a way that it does not start immediately, but always tries to keep the currently played notes approximately in the center of the screen.
Get the app from Apple App-Store.

